dsh-deepseek-usage
Verified@xavier711/dsh-deepseek-usage · v0.7.1 · MIT · Web UI
DeepSeek usage panel for the DSH Web GUI: account balance (official /user/balance API) plus per-model and per-workspace local session token statistics
Install
dsh plugin add @xavier711/dsh-deepseek-usage Confirm the layer applied with dsh --profile default --dump-config — see the install guide.
Source
Tags
Creators
Readme
dsh-deepseek-usage
DeepSeek 用量面板插件 —— 装在 DeepSeek Harness 的 Web 界面里,在左侧边栏底部显示你的用量:
- 账户余额:实时查询官方接口
GET /user/balance(余额、充值/赠送拆分) - 本地用量:回放你本机会话日志里的官方 token 计数 —— 今日 / 近 7 天 / 累计、7 天柱状图(可切近 30 天 / 近 12 个月,按 token 类型堆叠,并带累计总量 / 单日峰值 / 连续天数一行)、最近 6 个月的 token 活动热力图(一天一格,可切 每日 / 每周 / 累计 —— 一列是一周,没用量的那天留空;鼠标停在某一列会整列高亮并显示那一周的完整构成)、今日构成、按模型统计(本地部署与第三方模型只统计 token、不计费,只有走 DeepSeek 官方 API 的调用才算钱)、按工作区统计(工作区 = 会话所在的项目目录,折叠面板按工作区展开查看各自的会话记录;子代理会话计入其父工作区)
- 费用估算:按模型套用 DeepSeek 官方定价(只有走 DeepSeek 官方 API 的调用才计价 —— 本地部署与第三方 provider 只统计 token、不算钱;含 2026-08-17 起 V4 系列峰谷定价,北京时间自动区分高峰/空闲;2026-08-23 起周末(周六、周日)全天按低谷价计费,不再区分峰谷;2026-09-19 官方补充说明进一步明确调休上班的周末、中国法定节假日全天同样按空闲时段计费(假期日期取自本仓库的
holidays.json,每 6 小时刷新一次,并内置 2026 年国务院安排作为离线兜底);2026-09-10 12:00 起 flash 系列降价至空闲 ¥1 / 缓存命中 ¥0.02 / 输出 ¥4、高峰翻倍)。V4 Pro 继续按自身峰谷价计费——其 2026-09-14 下线已于 9-11 公告取消,不按 V4.1 Flash 计费。侧边栏入口和面板头部会实时显示当前时段标识(高峰/空闲,含当前时段区间与下一次切换时间) - 兼容新旧 DSH:会话历史读取同时支持新版
sessionPersistence(list()返回快照 +open(id,'read')读句柄)与旧版接口(list()返回 header +inspect()),在新版 harness 上不会再出现「会话历史读不到」
说明:DeepSeek 官方 API 没有账号级用量查询接口(实测所有候选路径均 404),所以用量数据来自 harness 本地会话日志 —— 日志里记录的就是官方每次请求返回的真实 usage。
界面预览
点击侧边栏底部的「用量」入口打开面板。下图数据均为虚构示例,不含任何真实余额、Key、token 或会话内容。
| 深色主题 | 浅色主题 |
|---|---|
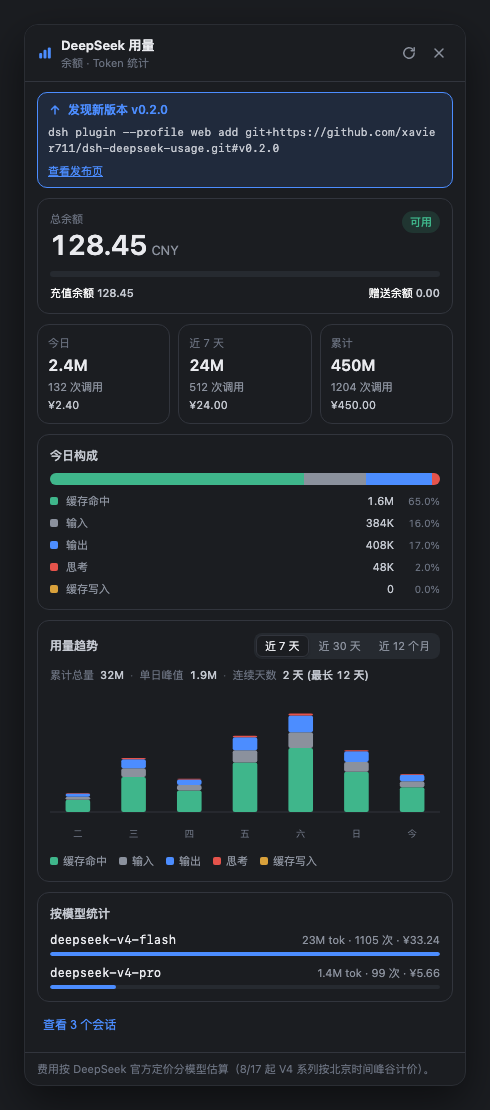 |
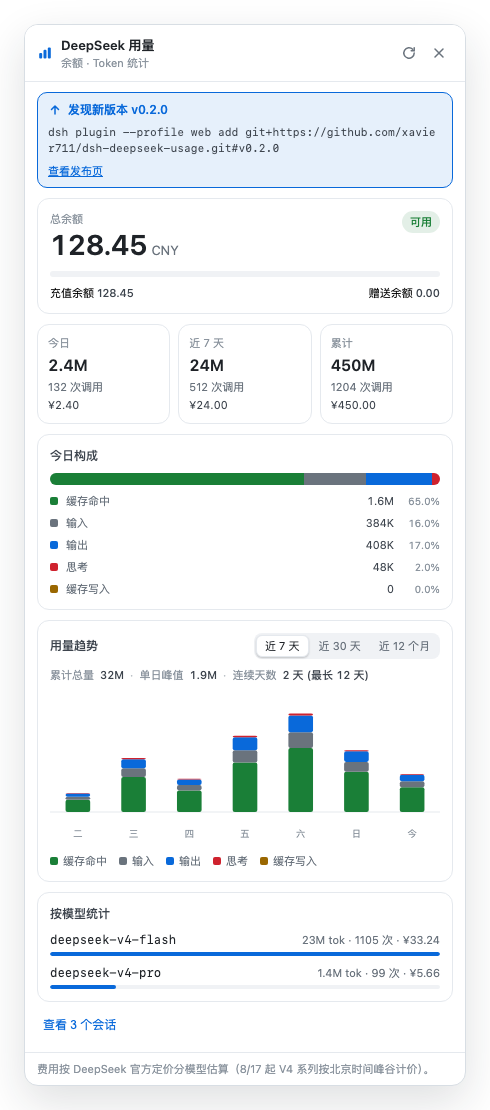 |
安装(3 种方式,选一种)
需要先装好 Node.js(nodejs.org 下载安装即可)。
方式 A:GitHub 直接安装(推荐,一条命令)
在终端粘贴运行:
dsh plugin --profile web add git+https://github.com/xavier711/dsh-deepseek-usage.git#v0.7.1
没有全局安装过 dsh? 用这条(npx 会自动下载):
npx --yes @deepseek-ai/dsh plugin --profile web add git+https://github.com/xavier711/dsh-deepseek-usage.git#v0.7.1
提示:安装过程中如果提示 pnpm 不存在,先运行
npm install -g pnpm再重试。
方式 B:下载文件夹 + 一键脚本
- 下载或 clone 本仓库:
git clone https://github.com/xavier711/dsh-deepseek-usage.git
cd dsh-deepseek-usage
- 运行安装脚本(脚本会自动处理
dsh不存在的情况,改用 npx):
./install.sh
方式 C:npm 安装
dsh plugin --profile web add @xavier711/[email protected]
安装后(无论哪种方式)
- 重启 web 服务:在运行
dsh web的终端按Ctrl+C,然后重新运行dsh web(没有全局 dsh 就运行npx --yes @deepseek-ai/dsh web) - 刷新浏览器页面:左侧边栏底部、设置按钮上方会出现一个「用量」入口
因为插件声明了
dsh.bundle,安装命令会自动激活插件行,不需要手动改任何配置文件。
可选:配置 API Key(看余额用)
编辑 ~/.dsh/.credentials.yaml,加入一行(把 sk-xxxx 换成你自己的 Key):
DEEPSEEK_API_KEY: sk-xxxx
或者设置环境变量 DEEPSEEK_API_KEY。不配置也能看本地用量统计,只是余额卡片会提示。
卸载
dsh plugin --profile web remove @xavier711/dsh-deepseek-usage
然后重启 dsh web 并刷新页面。
隐私说明
插件不内置任何 API Key(代码里没有任何密钥)。Key 只在运行时从你自己机器的 ~/.dsh/.credentials.yaml 或环境变量读取,且只在服务器端使用——浏览器端永远接触不到 Key。放心分享。
项目结构
lib/index.js       宿主端:/dsh-usage/balance + /dsh-usage/local + /dsh-usage/period 路由
lib/client.js      浏览器端:侧边栏「用量」入口 + 面板(纯手写 bundle,无构建步骤)
cordis.patch.yml   插件自身的 patch 层(dsh.bundle 声明,安装即自动激活)
install.sh         一键安装脚本
配置项(可选,一般不用动)
在 ~/.dsh/profiles/web/cordis.patch.yml 里按行 id 覆盖:
- id: deepseek-usage
  config:
    balanceTtlMs: 60000      # 余额缓存毫秒数
    maxSessions: 100         # 统计最近多少个会话
    sessionConcurrency: 4    # 并行读取会话数
    balanceTimeoutMs: 10000  # 余额请求超时
    localTtlMs: 30000        # 本地统计缓存毫秒数(信号驱动刷新下保持廉价)
    newPricingAt: 1786896000000   # 峰谷定价生效时间(2026-08-17 00:00 北京时间)
    weekendOffPeakAt: 1787414400000  # 周末全天低谷价生效时间(2026-08-23 00:00 北京时间)
    holidayOffPeakAt: 1789747200000  # 法定节假日全天低谷价生效时间(2026-09-19 00:00 北京时间)
    holidayCalendarUrl: "https://raw.githubusercontent.com/xavier711/dsh-deepseek-usage/main/holidays.json"
                                     # 维护用的假期日历,每 6 小时拉取一次;设为 null 可关闭远端
    holidayCalendarTtlMs: 21600000   # 拉取到的日历缓存时长(毫秒)
    holidayWorkdays: []              # 逃生口:即使落在周末/假期也按时段计费的日子(按现行口径留空)
    holidayRanges:                   # 可选覆盖;一旦设置即优先于远端日历,并完全不再发起请求
      - { name: 中秋节, start: "2026-09-25", end: "2026-09-27" }
      - { name: 国庆节, start: "2026-10-01", end: "2026-10-07" }
    peakHours: [[9,12],[14,18]]   # 北京时间高峰时段
    # pricing: 按模型单价(元/百万 tokens);每项可带 eras: [{ at, peak, offPeak }]
    #          表达「自某时刻起换价」(如 2026-09-10 12:00 起 flash 系列降价)。
    #          V4 Pro 不带 era:它不按 flash 计费,详见源码仓库
节假日每年都变 —— 但你不需要做任何事。 国务院通常在前一年年底公布次年的 放假安排,插件会每 6 小时拉取一次本仓库的
holidays.json: 维护者只需把新的一年写进这一个文件,已安装的插件会在下次刷新时自动生效, 既不用发版,也不用用户操作。优先级是 你的holidayRanges→ 远端holidays.json→ 内置 2026 表,所以本地覆盖或下载失败都不会让你失去日历; 远端文件只要有一处不合法就整份丢弃(绝不半份生效)。若日历没有覆盖当前年份, 面板会明确提示,而不是悄悄把节假日算贵。调休上班的周末不必单列——它们本身 就是周六/周日,已按周末规则享受低谷价。
在图形界面里配置
上面这些项都不用改 YAML:侧边栏 →「插件」→ @xavier711/dsh-deepseek-usage → deepseek-usage 行 →「配置」。
表单由插件自己的 config schema 生成,宿主会逐项校验,并写进上面那个 cordis.patch.yml
的同一行 —— 保存一个字段就等于一条普通覆盖,清空字段即恢复内置默认值。
保存后请重启 dsh web:配置会立即写入 profile,但宿主不会热重载纯配置改动。
字段按「性能与刷新」「节假日日历」「时段与区域(高级)」「定价覆盖(高级)」分组;
pricing、peakHours、holidayRanges、holidayWorkdays 是 JSON 字段,结构同下文。
按模型覆盖单价只影响本地估算,不影响官方实际计费。
更新
npm 安装的用户:执行 dsh plugin --profile web update @xavier711/dsh-deepseek-usage(或按新版本号重新 add,如 ... add @xavier711/[email protected])。
Git 安装的用户:你安装的是固定 tag 的快照,不会自动更新——但你也不用自己去查:插件每次打开用量面板时(带小时级缓存)会查询 GitHub 最新发布,如果有新版本,面板顶部会显示**「发现新版本」**提示条。
点提示条里的**「立即更新」**,插件会直接帮你装上新版本,不用碰终端。装完面板会告诉你结果;如果界面看着没变,重启一下 App 即可。(安装动作交给 harness 的插件管理器执行:面板只是请它把本插件装到新 tag 上,不做别的事。)
有两种情况不显示按钮、只给命令:一是你用的 DSH 版本没有那个插件管理器,二是 link: 开发安装(重新安装会把你的开发目录换成 tag 副本)。无论哪种,命令就在提示条里:
dsh plugin --profile web remove @xavier711/dsh-deepseek-usage
dsh plugin --profile web add git+https://github.com/xavier711/dsh-deepseek-usage.git#v0.7.1
常见问题
安装时提示 dsh: warning: ... declares no dsh.bundle — installed as a plain dependency
装到了仓库的旧快照(pnpm 按提交缓存 git 依赖,在插件声明 dsh.bundle 之前安装过就会保留旧版本)。重新从固定 tag 安装即可:
dsh plugin --profile web remove @xavier711/dsh-deepseek-usage
dsh plugin --profile web add git+https://github.com/xavier711/dsh-deepseek-usage.git#v0.7.1
然后重启 dsh web 并刷新页面。
安装后没有看到「用量」入口
确认安装后重启了 web 服务(在 dsh web 的终端按 Ctrl+C 再重新运行),并强制刷新浏览器(Cmd/Ctrl+Shift+R)。
HTTP 路由
GET /dsh-usage/balance—{ ok, isAvailable, currency, totalBalance, grantedBalance, toppedUpBalance, ... }GET /dsh-usage/local—{ ok, sessionCount, errorSessions, pricing, buckets: { today, week, total }, days: [...7], models: [...], workspaces: [...], sessions: [...] }——每个工作区条目为{ path, name, sessionCount, subagentSessionCount, buckets: { today, week, total }, sessions: [...] }(无工作目录的会话归入path: null);每个会话行带workspace与subagent字段(pricing 含newPricingAt、weekendOffPeakAt、holidayOffPeakAt、peakHours)GET /dsh-usage/period—{ ok, now, period: 'peak'|'offPeak'|'flat', range: [start, end] 分钟数, nextAt, nextPeriod, peakHours, weekendOffPeakAt, holidayOffPeakAt, offPeakDay, offPeakReason: 'weekend'|'holiday'|null, holiday, calendar, timezoneOffsetMinutes }— 当前北京时间高峰/空闲分类,供侧边栏徽标与面板头部使用;nextAt/nextPeriod描述下一次真正的时段切换(周末与节假日会直接跳到下一个工作日的首个高峰开始时刻);offPeakDay/offPeakReason/holiday说明今天是否全天低谷、依据哪条规则,以及具体节日名;calendar说明当前生效的假期日历来自哪里({ source: 'config'|'remote'|'builtin', updatedAt, publisher, years, currentYear, coversCurrentYear, url, error })